Thank you for choosing Smartpay. Let’s get you ready to begin taking payments.
What’s in the box
- A920Pro Android Terminal
- A920Pro Terminal base unit
- Power supply (USB type-C)
- Pre-loaded SIM card
- Protective screen
- Silicone case
The Android Terminal
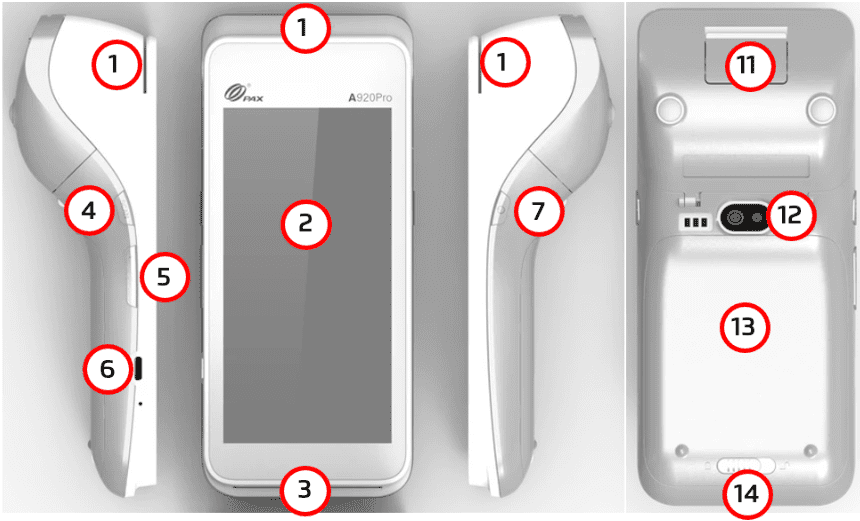
- Mag stripe reader
- Colour touchscreen
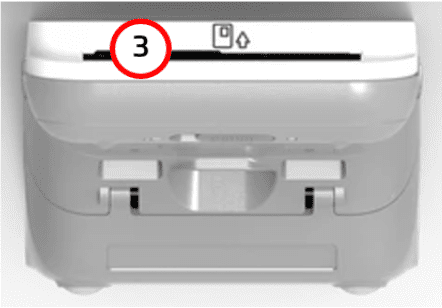
- Insert Card reader
- Scanner button
- Volume Control button
- USB-C Charging port
- Power button
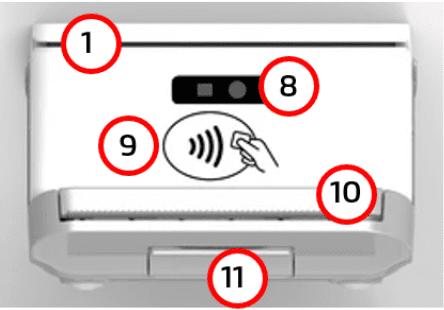
- Scanner
- Contactless card reader
- Printer
- Printer latch
- Rear Camera
- Battery cover
- Battery cover latch
Turning on the Android Terminal
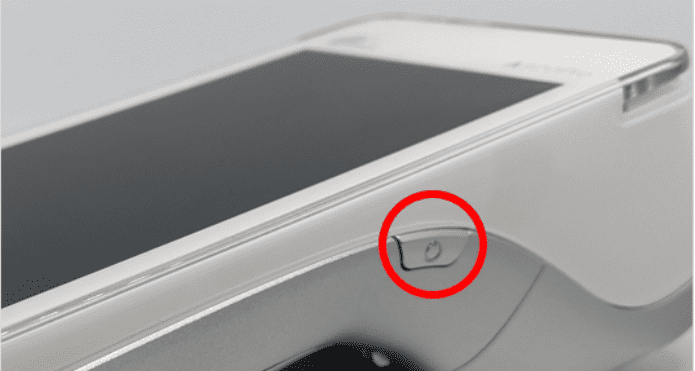
To power the terminal on, press and hold the power button on the right side of the terminal for 2-3 seconds.
Turning off the Android Terminal
To turn off press and hold down the power button on the right side of the terminal for 3 to 5 seconds and then select ‘Power Off’.
How to Restart the Android Terminal
To turn off press and hold down the power button on the right side of the terminal for 3 to 5 seconds and then select ‘Restart’.
Connectivity
Wi-Fi Connection Set-Up
If you do not have Wi-Fi please skip this step
- You will be prompted to configure Wi-Fi with “Configure Now?”
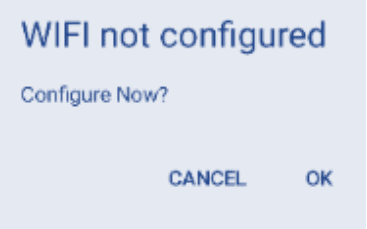
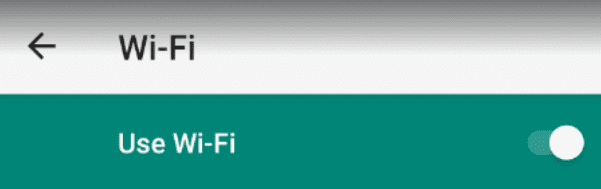
- Select ‘OK’ and the Wi-Fi setting screen will appear
- Select your preferred Wi-Fi network (Avoid free shopping centre Wi-Fi)
- Enter the Wi-Fi password
- After you have signed in click the back arrow in the top left (As pictured)
- Allow the terminal to run its initialisation cycle
(The home screen will appear when the initialisation is successful.)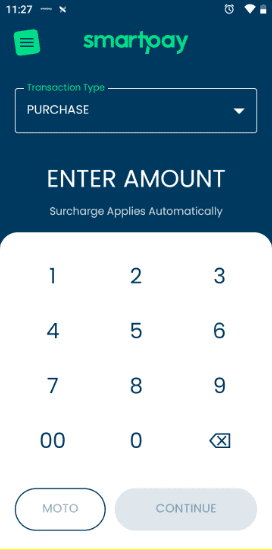
4G Only Set-Up
If you wish to use 4G only on your terminal;
- Select cancel
- Tick ‘Dismiss forever, I will use Mobile Data.’

Checking Terminal Connection
- Check that there is a Wi-Fi/4G signal at the top of the screen
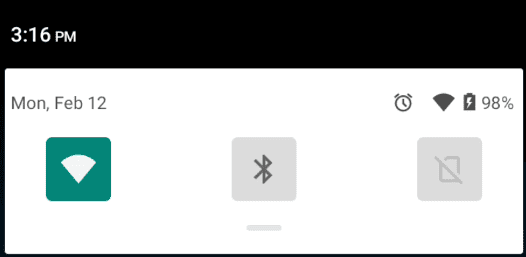
Wi-Fi:
4G:
- Tap on the ‘3-line/Hamburger’ ☰ icon

- Tap on ‘Merchant Menu’
- Tap on ‘Log On’
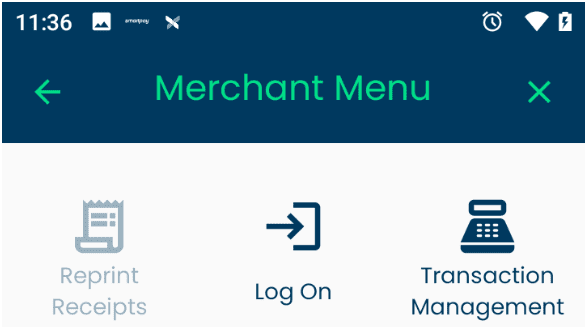
- The terminal will print out a receipt ‘Log On Success’
If not please call 1800 433 876
Payments & Refunds
Making a Payment
- Transaction Type Purchase then Enter the amount on the screen
- Press ‘Continue’ when you are ready to proceed with a payment
- Press the ‘X’ in the top Right Corner to cancel a transaction
- Get the customer to Tap, Insert or Swipe their card
Performing a Refund
- Change Transaction Type to Refund
- Enter the refund amount on the screen
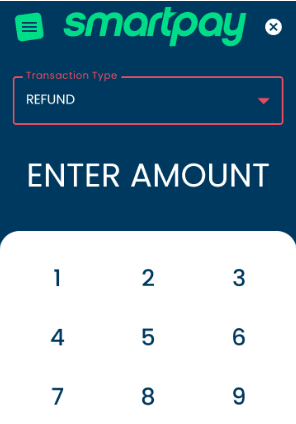
- Press ‘Continue’ when you are ready to proceed with the refund
- Enter the refund password (You will need to get this from SmartPay)
Smart Tip: A refund can only be performed with the same payment method
Change Paper Roll
- Flip the terminal over
- Lift the printer hatch lever underneath the terminal

- Remove the empty paper roll core
- Insert the new roll in the paper well, as pictured, Thermal side facing down in this image Extend an inch of the paper roll over the top of the lid

- Close the printer cover by pressing it shut.

Smart Tips:
- The receipt will print blanks, if the roll is not inserted in the correct direction.
- Make sure the paper roll feeds in the correct direction, with the Thermal side for printing on
Settlement
- Tap on the ‘3-line/Hamburger’ ☰ icon
- Tap on ‘Merchant Menu’ to display a selection of options.
- Tap on ‘Merchant Reports’
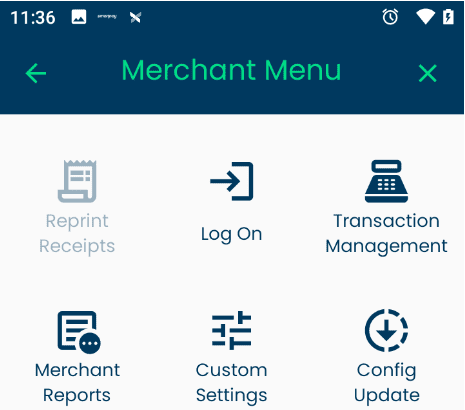
- Tap on ‘Summary Report’.
Smart Tip:
- This option will not zero (clear) the transactions of the day. The Automatic settlement which is set by default will do this.
Previous days Settlement:
- Tap on the ‘3-line/Hamburger’ ☰ icon
- Tap on ‘Merchant Menu’ to display a selection of options.
- Tap on ‘Merchant Reports’
- Tap on ‘Last Reconciliation’
Display & Audio Settings
Screen Settings
When the Screen Goes to Sleep:
Tap the screen twice to wake the screen or, press the power button on the right side of the terminal to wake the screen.
To Adjust Screen Brightness:
- Swipe down from the very top of the screen

- The Android Menu will appear, swipe down again on the tab, to expose the Brightness bar
- To increase brightness, hold and move the dot on the screen brightness bar towards the right
To decrease brightness, hold and move the dot towards the left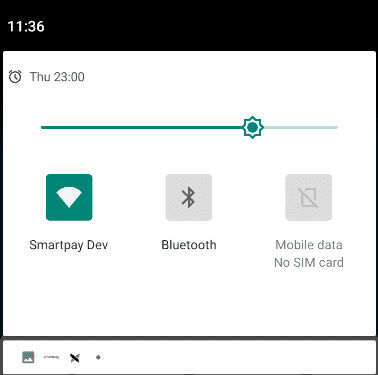
Volume Settings:
Left side of the terminal there is a + and – press this to turn the volume up and down.
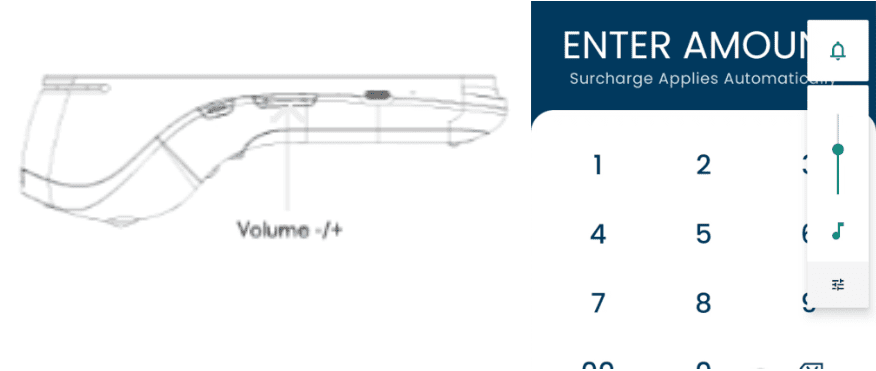
If you wish to mute the terminal (no sound) Press either + or – to bring up the volume controls. Then select the Bell symbol on the screen.
Sound on:

Mute:

Receipt Options
Reprint Receipt:
Tap on the ‘3-line/Hamburger’ ☰ icon to see menu options. Select ‘Reprint Receipt’.
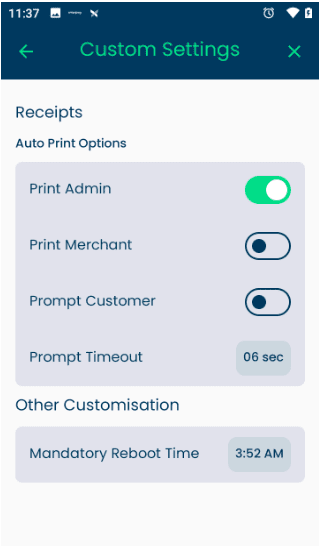
Change Print Receipt Options:
- Tap on the ‘3-line/Hamburger’ ☰ icon to see menu options.
- Tap on ‘Merchant Menu’ to display Merchant related functions
- Tap on ‘Custom Settings’
- Turn on options by swiping the toggle switch to the right
- Print Admin (Settlements will display on screen)
- Print Merchant (Merchant copy)
- Print Customer (Receipt auto prints)
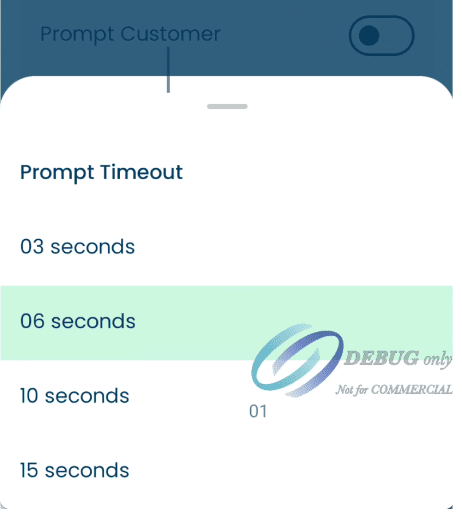
- Prompt Customer (ask if you would like to print)
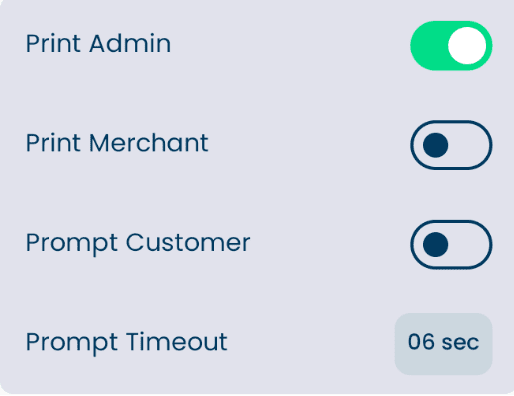
‘Prompt Customer’ for a receipt is set to timeout in 6 seconds by default. Tap the time to re-select your preferred timeout.
Transactions
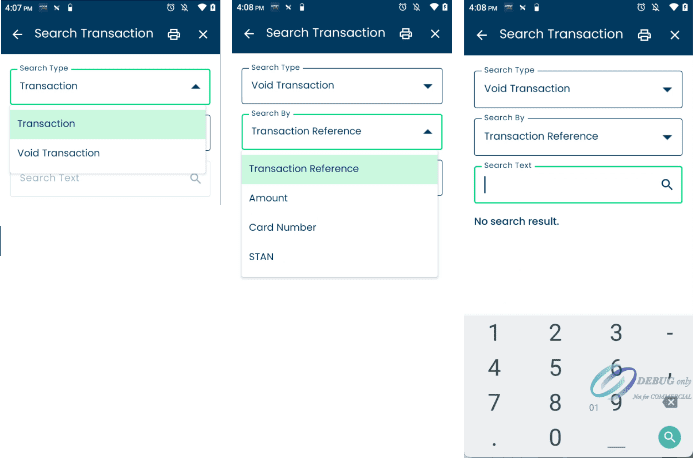
Transaction Search
Transaction search can be used to find and reprint a previous transaction or perform a VOID of a previous transaction.Tap on the ‘3-line/Hamburger’ ☰ icon to see menu options.
How to Search for a Previous Transaction:
- Select ‘Search Transaction’, it will default to ‘Transaction’ Search type
- Use the ‘Search by’ dropdown to select what you want to search
- Enter the search value and tap the
search key, or the result in background to close the keyboard
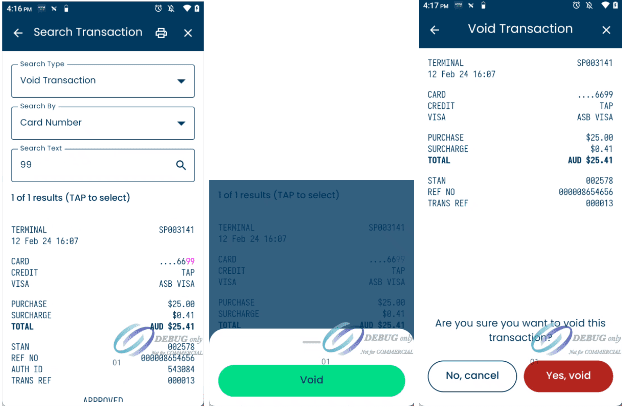
How to Search and Void a Transaction
- Select ‘Search Transaction’
- Use the ‘Search by’ dropdown to select ‘Void Transaction’
- Enter the search value for the transaction you want to Void
- Tap on the transaction to pop-up the Void option
- You will be prompted to reconfirm this is the correct transaction – Confirm to Void
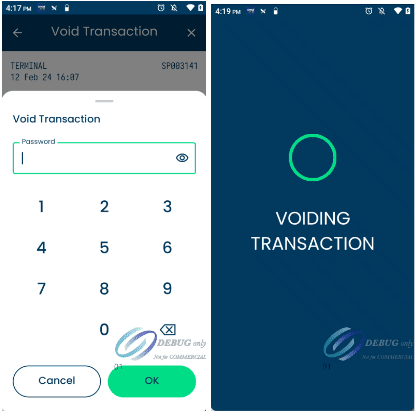
- Enter your Void Password
- Transaction will be voided
Advanced Settings
How to Change Your Terminal Wi-Fi Network:
- Swipe down from the very top of the screen to bring up Wi-Fi, Bluetooth or Mobile Data options.
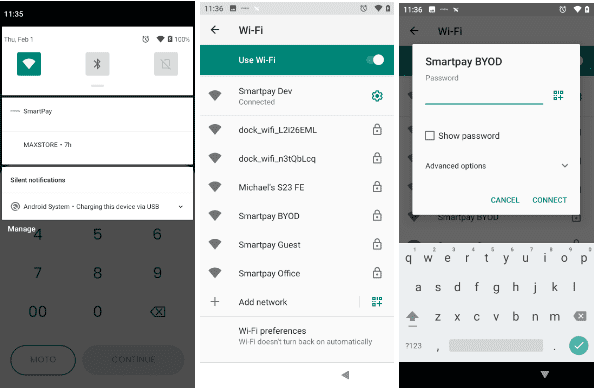
- Tap on the
Wi-Fi icon to enable Wi-Fi.
- Touch and hold the Wi-Fi icon
to open the available list of Wi-Fi connections.
- Select your preferred Wi-Fi connection.
- Enter the Wi-Fi password and select ‘CONNECT’.
Smart Tips:
- To return to the main screen, tap the back arrow on the top left ← or lower right of the
screen.
- A grey Wi-Fi icon means Wi-Fi is disabled/turned off
How to Change Your Terminal to ONLY Mobile 4G Network:
- Disable Wi-Fi by tapping on the Wi-Fi icon
- Make sure that the mobile data icon
is on
Smart Tip:
The Android terminal will default to Wi-Fi connection if Wi-Fi is not disabled.
Change the Mandatory Reboot Time:
- The terminal is pre-set to reboot at 4am, once every 24 hours.
- You may change the reboot time in ‘Custom settings’
to suit your business hours.
- If for any reason the terminal was turned off (between the pre-set reboot time) and restarted, please be aware that it will take 2 minutes for the terminal to restart.